Interviews
One pair of AirPods, split between two people. The subject wears the AirPod that is the microphone, so their voice is recorded up close anywhere within Bluetooth range of the iPhone. The videographer wears the other AirPod and stays at the iPhone.
Before you start
- Choose the microphone AirPod. In Settings › [your AirPods] › Microphone, choose Always Left AirPod or Always Right AirPod. The subject gets that AirPod. (With Automatic, iOS decides which AirPod is the microphone, and it can pick the videographer's.)
- Turn off Conversation Awareness in the same AirPods settings. It switches the AirPods into Transparency whenever the wearer talks, which in an interview is all the time.
- Use Noise Cancellation for Noise Control. In testing, Transparency added static to what the AirPods played while their microphone was in use.
In Interrotron
- Put the AirPods in, ideally before you open Interrotron: then it records them from the start. If Interrotron is already open, it notices them (allow Motion & Fitness when it asks). iOS shows its AirPods card, and the cameras pause while it is up. Close it (tap its ×) and Interrotron adds the AirPods microphone to the recording.
- Route the AirPods mic to the videographer's AirPod, so the videographer hears the subject.
- Route the iPhone mic to the subject's AirPod, so the subject hears the videographer's questions.
- Adjust Sensitivity and Volume for each microphone until both of you hear clearly. Set the routes before you press Record.
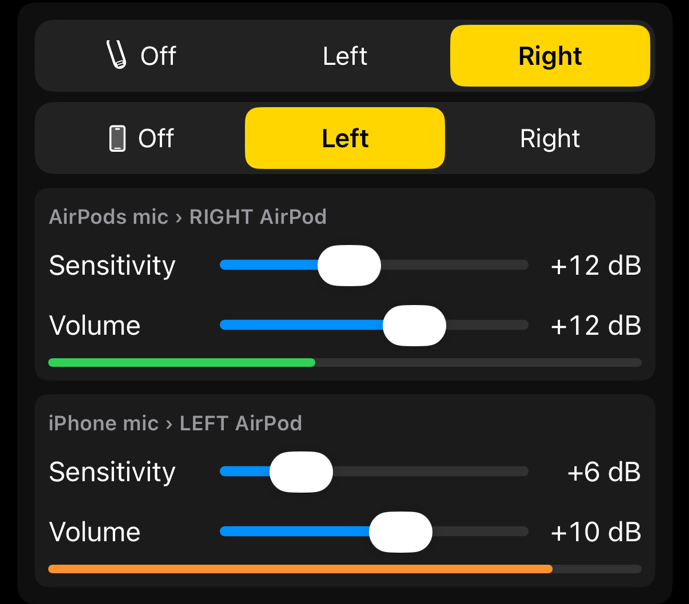
Every routing tap is spoken into both AirPods: "Right AirPod receiving AirPod microphone audio", or "Neither AirPod is receiving iPhone microphone audio" for Off. Tap the selected choice again to hear it again.
Good to know
- Interrotron can't tell which AirPod is the microphone. iOS doesn't let apps see or change it, so the Settings choice above is what decides it.
- Hearing yourself? A microphone that hears you is going to your own AirPod. Send the AirPods mic to the videographer's AirPod and the iPhone mic to the subject's. If the videographer still hears their own voice through the AirPods mic, the videographer is wearing the microphone AirPod: swap AirPods, so the subject wears the side chosen in Settings.
- Mono Audio (Settings › Accessibility › Audio & Visual) sends everything to both AirPods, so turn it off. Interrotron tells you when a Left or Right choice is reaching both AirPods anyway.
- Stay in Bluetooth range. The subject's AirPod is talking to the iPhone the whole time.
- The relay is only what you hear: Sensitivity and Volume never change the recordings, and each microphone is still recorded to its own file.